Chapter 5
Working with Triggers, Actions, Labels, and Cursors
In This Chapter
![]() Adding interaction to your composition with actions
Adding interaction to your composition with actions
![]() Creating triggers to execute actions
Creating triggers to execute actions
![]() Applying labels to actions and triggers
Applying labels to actions and triggers
![]() Creating clues with cursor attributes
Creating clues with cursor attributes
One especially powerful feature of Adobe Edge Animate CC is the capability to add actions, triggers, labels, and cursor attributes to your composition. These tools are what you use to make your animation interactive so your audience can participate in what your animation is doing instead of having to sit there and watch passively.
By placing labels in the Timeline, and associating them with actions and triggers, you can identify specific points in the Timeline, and you create a simpler means of controlling actions and triggers (as opposed to using timestamps). Through the use of labels, you don’t have to open the code box to change, for example, the point in time at which you want the animation to play when a trigger or action is called. Rather, you just have to slide the label up or down the Timeline to edit the action or trigger. Using labels helps you skip a step — opening the code box — if you need to edit your actions to reflect a different point in the Timeline.
When you place interactive elements into the Timeline, it’s a good idea to change the cursor attribute to provide a visual clue to your audience. Knowing that an element is (say) clickable, sizable, or what have you makes the audience more inclined to interact with the composition. If the cursor never changes, then your viewers may never know they could have clicked instead of just sitting there.
Inserting Stage Triggers
Adobe Edge Animate CC enables you to add Stage triggers — essentially commands that control how the animation plays. A Stage trigger occurs when the animation reaches a certain point in the Timeline where you’ve placed a command to make something happen onscreen. A typical command launched with a Stage trigger is looping — having an animation repeat when it reaches the end (or at some other point you designate). Figure 5-1 shows a list of available Stage actions.
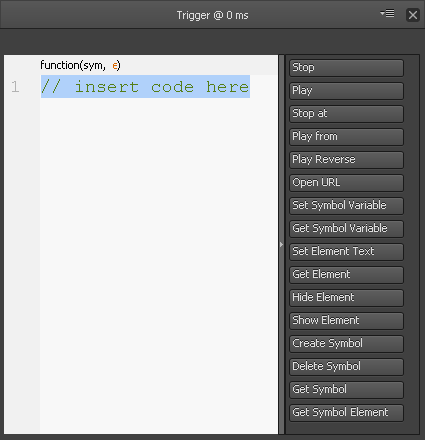
Figure 5-1: List of triggers you can use for the Stage.
 You can also add actions to the Stage along with triggers. For more information on adding Stage actions from the Elements panel, see Chapter 11.
Adding triggers to the Stage
To add Stage triggers, you have to perform a number of steps in a certain order. The following procedure shows how to add a loop to your animation through a Stage trigger:
1. Create an animation sequence to which you can add the Stage trigger.
For example, draw an element on the Stage using the drawing tools (see Chapter 3) and then create an animation sequence (see Chapter 4).
2. Position the Playhead on the Timeline where you want the Stage trigger to fire.
You could, for example, set a trigger at the end of the animation.
3. Click the Insert Trigger icon as identified in Figure 5-2.
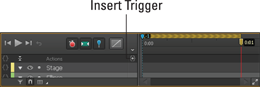
Figure 5-2: Click the Insert Trigger icon to open the menu.
When you click the Insert Trigger icon, the Trigger menu opens (refer to Figure 5-1).
4. With the menu open, click a trigger item on the right, for a loop, choose Play from.
Doing so inserts code into the window on the left (see Figure 5-3).
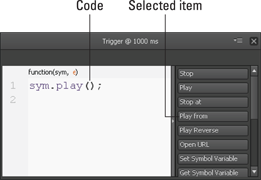
Figure 5-3: Click a trigger on the right to insert code on the left.
5. Click the X in the top-right corner of the Trigger box to close and save your trigger.
You see a Trigger icon in the Timeline, as identified in Figure 5-4.
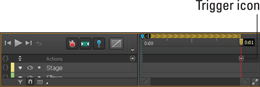
Figure 5-4: The Trigger icon inserted into the Timeline.
To see your loop in action, you need to preview it in a browser. To preview your animation in a browser, from the main menu, click File and then Preview in a Browser (see Figure 5-5).
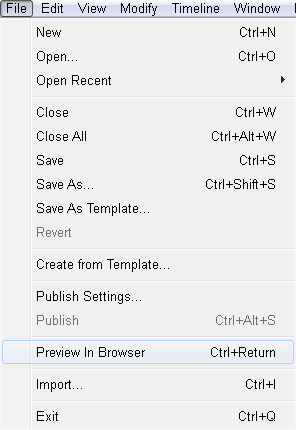
Figure 5-5: Click Preview in Browser to see your triggers in action.
Congratulations! You now have a loop within your animation.
You can add a label or designate a time in the Trigger box if you want your animation to loop back to a certain point in the Timeline instead of returning to the beginning. (I describe how to create and insert labels in the next section.)
If you want to designate time instead of a label, you can do that as well. Simply type in the ms (milliseconds) value in the parentheses in the Trigger box as shown in Figure 5-6. For example, if you want your animation to loop back to 0:01 in the Timeline, then type in 1000; if you want to loop back to 0:02 in the Timeline, then type in 2000.
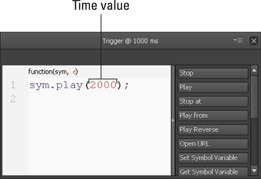
Figure 5-6: Designate a time in the Trigger Box to tell Edge Animate what point to play from.
You can edit Stage triggers a couple of different ways:
 You can move where the triggers are in the Timeline by clicking and dragging the Trigger icon (refer to Figure 5-4) up and down the Timeline.
Double-click the Trigger icon to open the coding box. You can then edit the trigger from within the coding box.
Labeling Key Points
You can add labels into the Timeline for use with Stage triggers and element actions. Say you want your animation to jump back to a certain point in time when it reaches the Stage trigger. You can use a label to determine where the animation jumps back to in the Timeline.
Using labels with Stage triggers has a unique advantage over using timestamps. You can drag a label up and down the Timeline to change the point, for example, where a loop is to begin. This is nice, because you don’t have to open the coding box to make the edit, which is what you would have to do if you used a timestamp.
Creating labels
To insert a label into the Timeline use the main menu; click Timeline and then Insert Label (Figure 5-7).
A label appears in the Timeline where the Playhead is located. You can name this label (as shown in Figure 5-8).
You can name this label as you see fit, but name it appropriately so you can remember later why you put it there. For example, if you want a slideshow presentation to loop back to the 1-second mark instead of looping all the way back to the beginning, then you insert the label at the 1-second mark and name it something like Restart Slide Show.
When you have a label inserted into the Timeline, you can go back and edit your trigger or action.
You can move the label up and down the Timeline by clicking and dragging. This comes in handy when you start making more advanced animations and you’re constantly finding good reasons to adjust exactly where you want the loop (or whatever) to start. Without a label, you’d have to keep opening up the Trigger box, adjusting the ms value, and fuming about having to do that.

Figure 5-7: Insert a label Into the Timeline from the main menu.
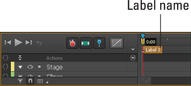
Figure 5-8: Name the label.
 You can change the name of the label by double-clicking it from the Timeline. Note that if you change the name of the label on the Timeline, then you have to go back to the trigger or action and update the name of the label in the code box as well.
Associating labels with actions and triggers
If you decide to add a label to your Timeline after you create a trigger or action, you can go back and edit the trigger or action to use the label.
To edit a trigger, double-click the Trigger icon (as shown in Figure 5-4).
To edit an action, select the element, right-click, and then choose Open Actions For.
With the Trigger/Action dialog box open, edit the code to show a label instead of a number of ms (milliseconds), as shown in Figure 5-9.
You have to use the single quotation marks for the label to work:
When you type the label correctly, the text appears orange.
If you forget the single quotation marks, the text appears purple.
Labels are case-sensitive. Therefore, if your label says Restart Slide Show but you type Restart slide show or Restart Slideshow in the Trigger box, your trigger won't work. Be sure to type the label exactly as it appears on the Timeline in the Trigger box.
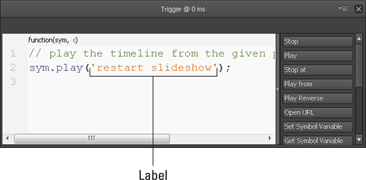
Figure 5-9: Trigger with a label.
When you’re using a specific ms value to identify a trigger, you need not use single quotation marks around the number; simply typing the number is sufficient. If you want to use a label, however, then you must use single quotation marks — one at the beginning and one at the end of the label. If you type in the label without the single quotation marks, the text appears in black to signal that the label is incorrect. If you use the single quotation marks correctly when you type the label, the text turns orange.
To use labels with Symbols and playback actions, see Chapter 12.
Inserting Element Actions
Adding actions to an element is similar to adding a trigger to the Stage. Two main differences exist between a Stage trigger and an element action:
An element action requires that your audience do something to make the action happen.
For example, your audience must click or mouse over an element to trigger the element’s action. For a Stage trigger, the audience doesn’t have to do anything at all because the Stage trigger fires when the animation reaches the point where the trigger is located. Figure 5-10 shows a list of available actions that you can designate so that your audience can fire an element action.
The Actions box for an element allows you to designate the type of interaction your audience must use to execute the action.
Stage triggers don’t work the same way as actions; they execute when the animation reaches a certain point in the Timeline, whatever the audience is (or is not) doing. They don’t require interaction.
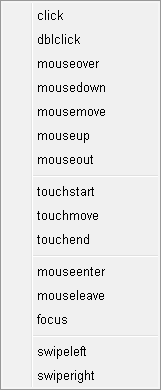
Figure 5-10: Actions you can designate to an element.
Element actions require interaction from the audience. These interactions include:
Click or dblclick: Choose these options if you want your audience to click or double-click an element for the action to occur. You can use the swipe actions in the same way as Click, for mobile-focused experiences.
Mouse: Use mouseover, mousedown, and other such actions if you want your audience to move the mouse over, into, or off of an element.
Touch: The touch actions refer to mobile devices and touch screens and act the same as a click. If you plan for your animation to work for both desktop and mobile, then using just Click is sufficient.
Focus: This action is tied to using the Tab key on the keyboard to enable your audience to select (or tab through) different elements; it has its own section of the chapter to detail the additional steps needed to implement it.
Adding actions to elements
One of the actions you may want to add to an element is to have it open a new URL. This capability is handy for creating menus or building links to other relevant content.
You can follow this same basic procedure for most of the other actions as well. (The additional steps for working with focus are coming up in the section directly after the steps for adding actions to elements.)
To start adding actions to an element, you must first create an element, as described in Chapter 3. With an element on the Stage, follow these steps:
1. Select an element, right click and choose Open Actions For (as shown in Figure 5-11).
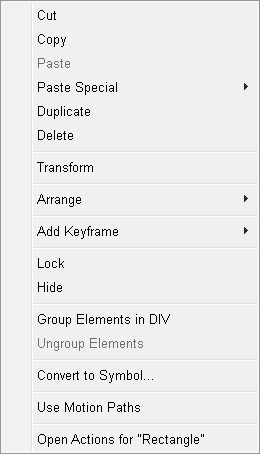
Figure 5-11: Right-click an element to open a large menu.
After you click Open Actions from the menu, a blank coding box (the place where you type in your commands) opens.
2. From the menu on the right, choose Open URL.
Edge Animate populates the box with code, as shown in Figure 5-12.
By default, Adobe Edge Animate CC uses the URL to adobe.com when you click Open URL. If another destination for the link suits your purpose better, simply replace the adobe.com URL with a URL that goes to where you want to send your audience.
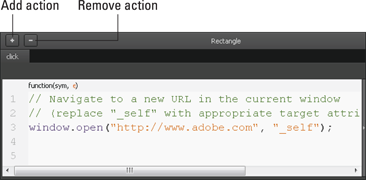
Figure 5-12: The Actions coding box looks like this with code in it.
You can use multiple actions on an element:
To add an action to an element, with the Actions coding box open, click the + in the upper-left corner, as indicated in Figure 5-12.
To remove an action from an element, click the –.
When you have more than one action associated with a single element, then Edge Animate displays all of the actions in a tab view (as shown in Figure 5-13). Simply click the tabs to display the relevant code for each action.
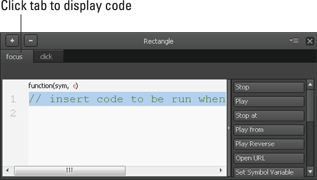
Figure 5-13: You can have more than one action per element.
3. From the menu on the right, choose Open URL.
4. Update the URL within the code box, which is highlighted in orange text.
5. Close the coding box to save your work.
6. Preview your animation in a browser to test your work.
To test to make sure that your link works, click the link with the mouse.
On most websites, when you place your mouse over a link, the cursor changes from an arrow to a hand. Using the procedures described in this chapter, you can set cursor attributes to provide visual clues to your audience to indicate, for example, where links are or to show if you can select an element.
Congratulations! You now have a loop within your animation.
If an element already has an action associated with it, then when you click Open Actions, Edge Animate immediately opens the coding box instead of the menu shown in Figure 5-11. When that happens, and you want to add a second action to that element, then click the + (as shown in Figure 5-12).
Using focus as an action
Focus is an action that requires a couple more steps. You need to set the Tab Index from the Properties panel to get it to work. This section discusses specifically how to use the Tab Index with the Focus action.
 Focus in Edge Animate is a jQuery event. From the jQuery API, "Elements with focus are usually highlighted in some way by the browser, for example with a dotted line surrounding the element." In Edge Animate, you can highlight an element by setting the tab index. For more information on focus, see
 http://api.jquery.com/focus.
To get started with the Focus action, follow these steps:
1. Create an element on the Stage, as described in Chapter 3.
2. Select the element.
3. At the bottom of the Properties panel in the Accessibility section, assign a number to the element in the Tab Index (as shown in Figure 5-14).
4. To test that your element now has a tab assigned to it, preview your animation in the browser.
Press the Tab key and the browser highlights your element:
• In Google Chrome, the highlight appears as a golden border.
• In Firefox and Internet Explorer, the highlight appears as a dotted line.
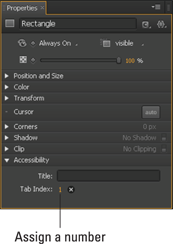
Figure 5-14: Setting the Tab Index to get Focus to work.
5. Close the browser window and return to Edge Animate.
6. Right-click the element, choose Open actions, and then choose Focus.
The coding box opens, and the following code appears:
// insert code to be run when an element gains focus
7. Choose an action from the menu on the right (such as Open URL).
8. Update the URL and then close the box to save your changes.
When you preview the animation in a browser and press the Tab key, when that element is highlighted — in effect, when it gains focus — the action is triggered. In this case, the new URL loads.
Adding Cursor Attributes
When you create, say, a button that your audience can interact with, your users expect some kind of signal to show them that part of the animation is clickable. A clear way to provide such a signal so your audience can interact with an element is to change the shape of the cursor. You do that by specifying attributes for the cursor. Read on.
Cursor attribute types
Edge Animate provides a large choice to choose from when it comes to cursor attributes, such as a pointing finger that indicates a link. As shown in Figure 5-15, you can change the cursor to represent different types of interactivity, including these:
Pointing finger: Indicates a link to click.
Watch: Indicates that something is loading and/or that the audience should wait for something to happen.
Sizing: Indicates that the audience can resize something such as a window or a column or a row.
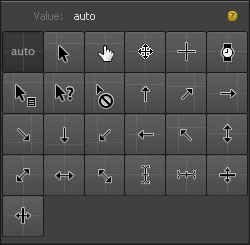
Figure 5-15: Edge Animate provides a wide range of cursor attributes.
Good animators always provide as many visual clues to their audience as possible. That’s how your audience realizes when and where an element of your composition is available for interaction.
Adding cursor attributes
Adobe Edge Animate CC allows you to change how the cursor looks by changing its attributes. This section shows you how to change the cursor into a pointer when you hover over a button in your composition.
To change the attributes of the cursor, follow these steps:
1. Select an element, such as a button.
2. From the Properties panel, click the Cursor Style icon as indicated in Figure 5-16.
3. Choose a cursor attribute from the menu (see Figure 5-15).
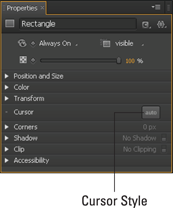
Figure 5-16: Click the Cursor Style button to open the Cursor Attributes.
To test that your cursor attribute is working, simply preview it in a browser. When you hover the mouse pointer over the element, it should change to a pointing finger, as shown in Figure 5-17.
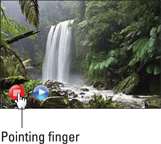
Figure 5-17: Here the cursor changes to a pointing finger when you hover over a button.